Upload images: Difference between revisions
update article |
No edit summary |
||
| (23 intermediate revisions by 3 users not shown) | |||
| Line 3: | Line 3: | ||
:*Questions can be asked on the [[Talk:Upload images|talk page]]. | :*Questions can be asked on the [[Talk:Upload images|talk page]]. | ||
:*When uploading the file, add a [[Help:Categories|category]] - see a list [[:Category:Images|here]]. | :*When uploading the file, add a [[Help:Categories|category]] - see a list [[:Category:Images|here]]. A new subcategory may be created if necessary. | ||
:*Find out [[Help:Images|how to use uploaded images]] | :*Find out [[Help:Images|how to use uploaded images]] | ||
| Line 17: | Line 17: | ||
:*[http://creativecommons.org/about/licenses Explanation of CC licenses] | :*[http://creativecommons.org/about/licenses Explanation of CC licenses] | ||
:*[http://creativecommons.org/licenses/ List of CC licenses] | :*[http://creativecommons.org/licenses/ List of CC licenses] | ||
:In the upload process there is a list from which you select the appropriate licence. See point 3. | |||
'''3. Clearly state the author, license and origin''' of the image by: | '''3. Clearly state the author, license and origin''' of the image by: | ||
| Line 22: | Line 23: | ||
# Select the appropriate license on the file upload page page. | # Select the appropriate license on the file upload page page. | ||
# Attribute the image. See [[:Category:Image License Tags|image license tag category]] to find the relevant license page where you can find instructions of how to attribute the image on the example page. | # Attribute the image. See [[:Category:Image License Tags|image license tag category]] to find the relevant license page where you can find instructions of how to attribute the image on the example page. | ||
'''Most family owned photographs have the Creative Commons Attribution 3.0 unported License'''. Refer the example photograph on this page [[:File:Wac(I) Benares.jpg| Wac(I) Benares.jpg]] and the [[:Category:A J Oliver family collection| A J Oliver family collection]]. | |||
''Images that do not meet these requirements will have to be deleted.'' | ''Images that do not meet these requirements will have to be deleted.'' | ||
'''4. Use descriptive file names''' | |||
:It is requested that you give the files a descriptive name which is related to the image. If you are uploading a photograph of something (say a church) in a town, it is preferable to put the town name first, as it makes it easier to spot relevant images when they are in a mixed category) as titles don’t always display fully in the thumbnail. You make any changes to the file names within your own computer system. | |||
'''5.''' <big>'''Please ensure images are scanned at 96 dpi and below 2MB in size.'''</big> | |||
:Permitted file types: png, gif, jpg, pdf. Jpeg files are the same type as jpg files, however for the upload to proceed, it may be necessary to change the file name from jpeg to jpg . You make this change to the file name within your own computer system. | |||
::Text display after a pdf upload. | |||
::An example of the text display after a pdf upload which is a small book file. The 2MB limit on size means that in practice, most pdf uploads will be one page images only. For the actual upload see next section. For the text display click on the Embedded file icon on the toolbar (the icon with two peaks) [[File:EastLancashireRegRecruitsHist.pdf|thumb||Recruit's History of the East Lancashire Regiment]]. If you want this to display as a clickable pdf icon use the format <nowiki>[[File:Fileicon-pdf.png|50px|link=File:EastLancashireRegRecruitsHist.pdf|Recruit's History of the East Lancashire Regiment]]</nowiki>[[File:Fileicon-pdf.png|50px|link=File:EastLancashireRegRecruitsHist.pdf||Recruit's History of the East Lancashire Regiment]] | |||
==The Fibiwiki upload procedure== | |||
[[File:1.READ page.jpg|thumb|350px|1.READ page]] | |||
[[File:2.EDIT page.jpg|thumb|350px|2.EDIT page]] | |||
[[File:3.EMBED FILE icon.jpg|thumb|350px|3.EMBED FILE icon]] | |||
[[File:4.INSERT image popup.jpg|thumb|350px|4.INSERT image popup]] | |||
[[File:5.UPLOAD from PC popup.jpg|thumb|350px|5.UPLOAD from PC popup]] | |||
[[File:6.UPLOAD your own image.jpg|thumb|350px|6.UPLOAD your own image]] | |||
[[File:7.UPLOAD other source image.jpg|thumb|350px|7.UPLOAD other source image]] | |||
[[File:8.UPLOAD file page other source.jpg|thumb|350px|8.UPLOAD file page other source]] | |||
[[File:9.RETURN to EDIT page.jpg|thumb|350px|9.RETURN to EDIT page]] | |||
# Prepare the file for upload. Make sure the file is exactly as you want it. | |||
# Log in to Fibiwiki. In the [[Help:Navigation#Sidebar|sidebar]], on a Fibiwiki page, under “{{lcfirst:{{int:toolbox}}}}”, click “'''{{int:upload}}'''.” | |||
# Click “'''Browse'''” next to the “'''{{int:sourcefilename}}'''” to locate the file on your computer (the name of the “browse” button depends on your web browser). | |||
# Change the “'''{{int:destfilename}}'''” to something descriptive, if necessary. | |||
# Fill in the “'''{{int:filedesc}}'''”, if necessary. | |||
# Choose a license from '''Licensing''' section drop down menu | |||
# Click the “'''{{int:uploadbtn}}'''” button. | |||
===Amending the license=== | |||
You may need to add a attribution to the licence template, and a category. | |||
'''Procedure'''<br> | |||
*Click on edit. | |||
*Details of the photograph are added under <nowiki>== Summary ==</nowiki> | |||
*Details of the licence holder are added under<nowiki>== Licensing ==.</nowiki> There will already be some wording here generated by the upload process. Add to, or replace this wording by, for example | |||
:<nowiki>{{cc-by-nc-nd-3.0|Details=''Owned by Fred Jones''}}</nowiki> which will generate wording | |||
:{{cc-by-nc-nd-3.0|Details=''Owned by Fred Jones''}} | |||
*Add categories eg for a cemetery in Bangalore add <nowiki>[[Category:Cemetery images]]</nowiki> <nowiki>[[Category:Bangalore images]]</nowiki> | |||
:If you have several images of the one cemetery, you may create a subcategory, eg <nowiki>[[Category:Poona cemetery images]]</nowiki>, (which in turn has <nowiki>[[Category: Cemetery images]]).</nowiki> | |||
:For a list of Categories see [[:Category:Images|Category:Images]]. | |||
:If you are a "beginner" and confused about the category to add, type <nowiki>[[Category:Help required]]</nowiki> and a moderator will add the correct category later. | |||
*Complete the edit by clicking on 'Show preview' to preview your changes, and then 'Save page'. The upload procedure is now completed. | |||
If you wish to upload another image, click on "Upload file" in the toolbox in the panel on the left hand side of the page. | |||
== Related articles == | == Related articles == | ||
[[ | *[[Help:Images]] | ||
[[Category:FIBIWiki basic information]] | [[Category:FIBIWiki basic information]] | ||
[[Category:Images]] | [[Category:Images]] | ||
[[Category:Help]] | |||
Latest revision as of 12:26, 14 April 2024
We are always looking for images to illustrate our articles or provide a useful source of information. If you have any pictures you are willing to upload, they would be very much appreciated. Please have a look at our requirements first below, then upload an image.
- Questions can be asked on the talk page.
- When uploading the file, add a category - see a list here. A new subcategory may be created if necessary.
- Find out how to use uploaded images
Requirements
When uploading images to the wiki, you need to:
1. Adhere to our copyright policy and only upload images that either:
- You own the rights to (usually meaning that you created the image yourself)
- You can prove that the copyright holder has licensed under an acceptable free license.
- You can prove is in the public domain in the UK.
2. Add a Creative Commons License when uploading images you own the rights to.
- In the upload process there is a list from which you select the appropriate licence. See point 3.
3. Clearly state the author, license and origin of the image by:
- Select the appropriate license on the file upload page page.
- Attribute the image. See image license tag category to find the relevant license page where you can find instructions of how to attribute the image on the example page.
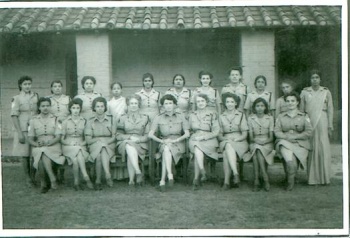
Most family owned photographs have the Creative Commons Attribution 3.0 unported License. Refer the example photograph on this page Wac(I) Benares.jpg and the A J Oliver family collection.
Images that do not meet these requirements will have to be deleted.
4. Use descriptive file names
- It is requested that you give the files a descriptive name which is related to the image. If you are uploading a photograph of something (say a church) in a town, it is preferable to put the town name first, as it makes it easier to spot relevant images when they are in a mixed category) as titles don’t always display fully in the thumbnail. You make any changes to the file names within your own computer system.
5. Please ensure images are scanned at 96 dpi and below 2MB in size.
- Permitted file types: png, gif, jpg, pdf. Jpeg files are the same type as jpg files, however for the upload to proceed, it may be necessary to change the file name from jpeg to jpg . You make this change to the file name within your own computer system.
- Text display after a pdf upload.
- An example of the text display after a pdf upload which is a small book file. The 2MB limit on size means that in practice, most pdf uploads will be one page images only. For the actual upload see next section. For the text display click on the Embedded file icon on the toolbar (the icon with two peaks) File:EastLancashireRegRecruitsHist.pdf. If you want this to display as a clickable pdf icon use the format [[File:Fileicon-pdf.png|50px|link=File:EastLancashireRegRecruitsHist.pdf|Recruit's History of the East Lancashire Regiment]]

The Fibiwiki upload procedure
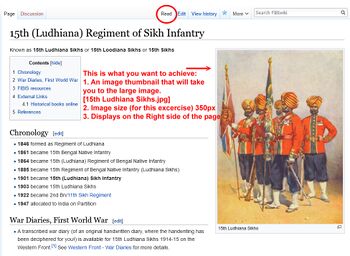
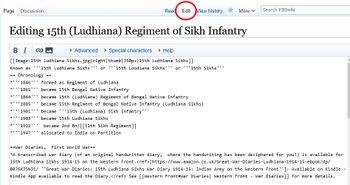
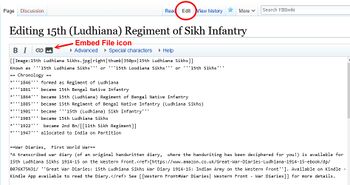
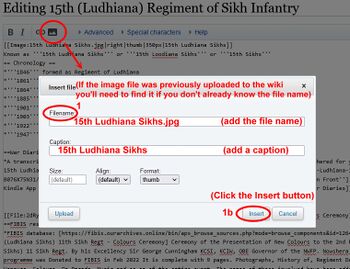
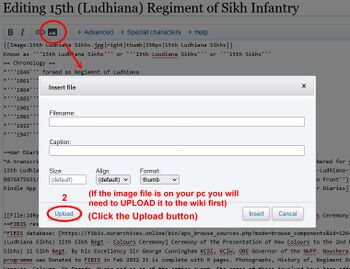
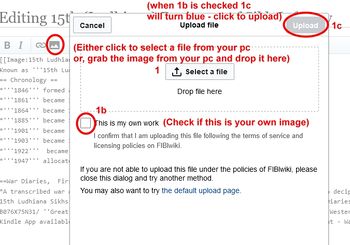
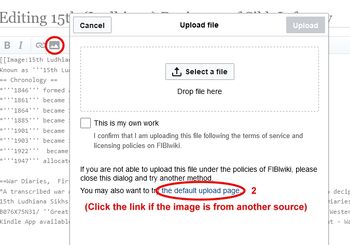
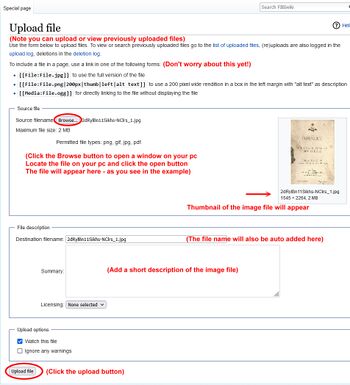
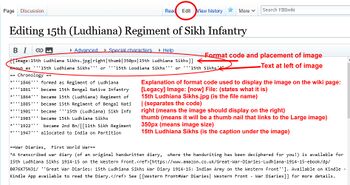
- Prepare the file for upload. Make sure the file is exactly as you want it.
- Log in to Fibiwiki. In the sidebar, on a Fibiwiki page, under “tools”, click “Upload file.”
- Click “Browse” next to the “Source filename:” to locate the file on your computer (the name of the “browse” button depends on your web browser).
- Change the “Destination filename:” to something descriptive, if necessary.
- Fill in the “Summary”, if necessary.
- Choose a license from Licensing section drop down menu
- Click the “Upload file” button.
Amending the license
You may need to add a attribution to the licence template, and a category.
Procedure
- Click on edit.
- Details of the photograph are added under == Summary ==
- Details of the licence holder are added under== Licensing ==. There will already be some wording here generated by the upload process. Add to, or replace this wording by, for example
- {{cc-by-nc-nd-3.0|Details=''Owned by Fred Jones''}} which will generate wording
This work is licensed under the Creative Commons Attribution 3.0 unported License.
Specific Attribution: Owned by Fred Jones
Anyone may use this image for any purpose provided it is attributed as specified.
- Add categories eg for a cemetery in Bangalore add [[Category:Cemetery images]] [[Category:Bangalore images]]
- If you have several images of the one cemetery, you may create a subcategory, eg [[Category:Poona cemetery images]], (which in turn has [[Category: Cemetery images]]).
- For a list of Categories see Category:Images.
- If you are a "beginner" and confused about the category to add, type [[Category:Help required]] and a moderator will add the correct category later.
- Complete the edit by clicking on 'Show preview' to preview your changes, and then 'Save page'. The upload procedure is now completed.
If you wish to upload another image, click on "Upload file" in the toolbox in the panel on the left hand side of the page.
Related articles
